When I saw the March release stamps from Pink & Main I thought that they are all perfect for colouring in. They are absolutely darling aren't they? I know three little girls who love to colour in so I decided to make colouring-in notebooks for them. I even tried personalising the front covers to look like each of them.
To make the colouring-in notebooks I took apart some plain, unlined notepads I had and stamped the images on the pages. I stamped the images for the cover on white cardstock and coloured them in. After cutting them out I added them to kraft covers with a matching watercolour pool for them to sit on. I also added a few drops of perfect pearls just to dress them up a little. Then I bound the pages and covers together with my cinch.
Because they are small in size they are perfect for their Mum to pop in her purse for those moments when they need to be entertained
DT Amanda
Saturday, April 11, 2015
Saturday, April 4, 2015
Quick Planning with DIY Stickers
This year there has been an explosion in the planner industry and I will admit that I have caught the planner bug. Just call me #plannernerd. Did you know that Pink & Main has planner stamps? They even have a section dedicated to planner stamps on their website. If you, like me, are into planning I strongly suggest you check it out.
This week I wanted to share with you a tip that I use for my planning: creating planner stickers. They are so simple and quick to make. I stamp up everything I need and have them on hand for when I don't have time to dedicate to decorating my week in my planner. It means I can still be organised and decorate with little effort. The other great thing about using stickers is that you don't get ink bleed-through like you do when you stamp directly in your planner.
Credit Alert: I first saw this idea shown by Jennifer McGuire
All you need is some office label stickers, alcohol ink pens and your favourite planner stamps. First you colour the labels in with your alcohol ink pens:
Easy right? The second step is to stamp away with the stamps that fit your plans and life. I stamped words from Life Tasks in black archival ink on the coloured labels:
One of the things I have started doing in my planner is adding a space for gratitude on every day. Because the word Gratitude or Thanksgiving is too long for my stickers; I got inventive with my Pink & Main stamps. The Lucky Charm stamp set has a phrase Lucky You. I cut the words apart and used the word Lucky on my stickers as my daily gratitude marker. When I want to use the phrase as a whole later I just need to add both words to my stamping block. Here's my Lucky stickers:
Lastly, put those stickers to use in your planners:
As you can see I am using a standard spiral bound planner. I like to decorate the week using supplies I have on hand. I may add leftovers from other projects, diecuts, stickers or pieces from recent purchases. I also like to stamp positive sayings each week - in the week above I used the washi tape as my positive focus for that week: smile. It is very handy that the new March release stamp set called Rose has a fancy script word Rose on it. I have a regular appointment with someone called Rose so I will use this a lot.
The reason I am focusing on planner stamps/stickers this week is because there may be a few 'developments' in the planning area here at Pink & Main. I'm not at liberty to confirm or deny this rumour (that I'm starting) but let's just say I'm super excited. Just because there may be things 'developing' you still need the basics to start out with so don't forget to check out the other planning sets on the Pink & Main website here.
Life Tasks was my first purchase from Pink & Main and it gets used a lot in my weekly planner. I have added the other planner stamps to my collection but I just focused on Life Tasks for the Pink & Main blog post. Below are some other stickers I created with Life Icons:
Life Icons is great for reminding me of my goals like Bible reading (books) and Saving ($ signs) as well as weekly tasks like Dog Walking (paw), Shopping (Cart), Photos (camera) and Emails (Envelope). The icons are great too for Meal Planning or Tracking Food Intake if that is something that you do. The coffee cup icons are food café dates.
These are the two stamp sets I used for my stickers on the Pink & Main blog this week:
DT Amanda
This week I wanted to share with you a tip that I use for my planning: creating planner stickers. They are so simple and quick to make. I stamp up everything I need and have them on hand for when I don't have time to dedicate to decorating my week in my planner. It means I can still be organised and decorate with little effort. The other great thing about using stickers is that you don't get ink bleed-through like you do when you stamp directly in your planner.
Credit Alert: I first saw this idea shown by Jennifer McGuire
All you need is some office label stickers, alcohol ink pens and your favourite planner stamps. First you colour the labels in with your alcohol ink pens:
Easy right? The second step is to stamp away with the stamps that fit your plans and life. I stamped words from Life Tasks in black archival ink on the coloured labels:
One of the things I have started doing in my planner is adding a space for gratitude on every day. Because the word Gratitude or Thanksgiving is too long for my stickers; I got inventive with my Pink & Main stamps. The Lucky Charm stamp set has a phrase Lucky You. I cut the words apart and used the word Lucky on my stickers as my daily gratitude marker. When I want to use the phrase as a whole later I just need to add both words to my stamping block. Here's my Lucky stickers:
Lastly, put those stickers to use in your planners:
As you can see I am using a standard spiral bound planner. I like to decorate the week using supplies I have on hand. I may add leftovers from other projects, diecuts, stickers or pieces from recent purchases. I also like to stamp positive sayings each week - in the week above I used the washi tape as my positive focus for that week: smile. It is very handy that the new March release stamp set called Rose has a fancy script word Rose on it. I have a regular appointment with someone called Rose so I will use this a lot.
The reason I am focusing on planner stamps/stickers this week is because there may be a few 'developments' in the planning area here at Pink & Main. I'm not at liberty to confirm or deny this rumour (that I'm starting) but let's just say I'm super excited. Just because there may be things 'developing' you still need the basics to start out with so don't forget to check out the other planning sets on the Pink & Main website here.
Life Tasks was my first purchase from Pink & Main and it gets used a lot in my weekly planner. I have added the other planner stamps to my collection but I just focused on Life Tasks for the Pink & Main blog post. Below are some other stickers I created with Life Icons:
Life Icons is great for reminding me of my goals like Bible reading (books) and Saving ($ signs) as well as weekly tasks like Dog Walking (paw), Shopping (Cart), Photos (camera) and Emails (Envelope). The icons are great too for Meal Planning or Tracking Food Intake if that is something that you do. The coffee cup icons are food café dates.
These are the two stamp sets I used for my stickers on the Pink & Main blog this week:
DT Amanda
Saturday, March 14, 2015
Pink & Main - Movie Star Birthday Card
My card for this week uses the great Movie Star stamp set. As always there are so many great images and phrases to use. You'll never get bored creating projects with this movie themed stamp set.
For my card I created a background pattern then added a piece of Tim Holtz film reel and applied a stamped sentiment block on top (using foam tape). To finish the card I stamped the ticket stamp several times, coloured them and cut them out. Then I applied the tiny tickets to the film reel strip.
To create the background pattern I stamped the film reel repeatedly with Versamark ink on the white background cardstock then I applied two different colour inks over it with foam applicators. The Versamark resisted the ink and you get a subtle film reel image on the background. Then I stamped the ticket in purple ink in between the film reel pattern. Here's a close-up picture for you to see the background and the individual tickets I applied to the film reel strip as well.
As you can see I inked the edges of my card and elements - it makes such a difference.
Take a look at the Movie Star stamp set I used - super fun!
DT Amanda
Materials:
Stamps - Pink & Main; Ink - Tim Holtz; Cardstock - Bazzill; Film Strip - Tim Holtz; Markers - Tim Holtz, Stampin' Up!.
For my card I created a background pattern then added a piece of Tim Holtz film reel and applied a stamped sentiment block on top (using foam tape). To finish the card I stamped the ticket stamp several times, coloured them and cut them out. Then I applied the tiny tickets to the film reel strip.
To create the background pattern I stamped the film reel repeatedly with Versamark ink on the white background cardstock then I applied two different colour inks over it with foam applicators. The Versamark resisted the ink and you get a subtle film reel image on the background. Then I stamped the ticket in purple ink in between the film reel pattern. Here's a close-up picture for you to see the background and the individual tickets I applied to the film reel strip as well.
As you can see I inked the edges of my card and elements - it makes such a difference.
Take a look at the Movie Star stamp set I used - super fun!
DT Amanda
Materials:
Stamps - Pink & Main; Ink - Tim Holtz; Cardstock - Bazzill; Film Strip - Tim Holtz; Markers - Tim Holtz, Stampin' Up!.
Sunday, March 8, 2015
Pink and Main Wine Labels
This week I played with the Pink & Main stamp set called Cheers and made labels for wine bottles. Once I made one I had to make another. They are so quick to make and look so cool.
There are so many variations you could do with this idea. The stamps cover all kinds of reasons you might like to give someone a wine bottle or spirit bottle. For the first one I used white cardstock and I stamped it with the images and phrases (plus a strip of washi). I added orange kindyglitz to the inside of the wine glasses - I love how they look sparkly like champagne.
Here's a close-up so you can see the shine on the wine glasses:
On the second label I used the cocktail glass and I used mint perfect pearls on the frosting on the top of the glass. It is so simple but looks really effective. This one was made with patterned paper as a background.
Here's a close-up for you to see the frosting:
The Cheers stamp set I used is shown below:
To make the labels: I took a piece of cardstock or patterned paper and used my largest hole punch for the hole for the wine bottle top. You could draw around a glass if you don't have a large enough hole punch. I then created a fold so that it sat flat against the bottle. #decorateaway #supereasy
Only one thing left to say - Cheers my friends!
Materials:
Stamps - Pink & Main; Ink - Ranger, Stampin' Up!; Cardstock - Bazill; Paper - DCWV, Unknown; Markers - Ranger, Stampin' Up!; Kindyglitz.
There are so many variations you could do with this idea. The stamps cover all kinds of reasons you might like to give someone a wine bottle or spirit bottle. For the first one I used white cardstock and I stamped it with the images and phrases (plus a strip of washi). I added orange kindyglitz to the inside of the wine glasses - I love how they look sparkly like champagne.
Here's a close-up so you can see the shine on the wine glasses:
On the second label I used the cocktail glass and I used mint perfect pearls on the frosting on the top of the glass. It is so simple but looks really effective. This one was made with patterned paper as a background.
The Cheers stamp set I used is shown below:
To make the labels: I took a piece of cardstock or patterned paper and used my largest hole punch for the hole for the wine bottle top. You could draw around a glass if you don't have a large enough hole punch. I then created a fold so that it sat flat against the bottle. #decorateaway #supereasy
Only one thing left to say - Cheers my friends!
Materials:
Stamps - Pink & Main; Ink - Ranger, Stampin' Up!; Cardstock - Bazill; Paper - DCWV, Unknown; Markers - Ranger, Stampin' Up!; Kindyglitz.
Friday, February 27, 2015
Pink and Main Birthday Card
After showing you some ways to use multiple stamps on the same project I'm finally going to show you a card. For this week's card I used just one stamp set and a few basic supplies. The stamp set I used is called Misses.
When I had decided I wanted to use the silhouette with the phrase I decided I also wanted to use feathers. The image just reminded me of vintage ladies with feathers in their hats. The feathers I had decided the colour scheme and it was easy to pull the card together from there. I was tempted to add drops of perfect pearls for her earrings and necklace as I have previously done (in this blog post) but I decided she was pretty just as she was.
Here's the stamp set I used - Misses. As you can see there are a lot of phrases and images that you can use on so many different projects (not just for birthdays).
As always, you can purchase the stamps at: Pink & Main
Materials:
Stamps - Pink and Main; Ink - Ranger; Die - Spellbinders; Paper - Authentique; Cardstock - Bazzill; Gem - Papervine; Other - Feathers and Foam Tape.
When I had decided I wanted to use the silhouette with the phrase I decided I also wanted to use feathers. The image just reminded me of vintage ladies with feathers in their hats. The feathers I had decided the colour scheme and it was easy to pull the card together from there. I was tempted to add drops of perfect pearls for her earrings and necklace as I have previously done (in this blog post) but I decided she was pretty just as she was.
Here's the stamp set I used - Misses. As you can see there are a lot of phrases and images that you can use on so many different projects (not just for birthdays).
As always, you can purchase the stamps at: Pink & Main
Materials:
Stamps - Pink and Main; Ink - Ranger; Die - Spellbinders; Paper - Authentique; Cardstock - Bazzill; Gem - Papervine; Other - Feathers and Foam Tape.
Monday, February 23, 2015
Pink and Main Planner
This year I have embraced the planner craze - call me #plannernerd! One of the things I use regularly in my planners (yes, plural) are stamps. Pink and Main have a great planner set called Life Tasks which I have, but I really want them all now that I've become hooked! I also use any stamp set that I think fits my theme or activities. You will be amazed at how you can use something from most stamps sets in your planner.
My creative planner this year is a Heidi Swapp Memory Planner which I use to document my everyday and special occasions. This is my spread for February so far:
I like adding lift ups too for more space for writing. For Valentines day I added a small accordion booklet to document my day with images and sayings from the new release stamp sets:
On the other page of the planner is a page of photo pockets. This month just happened to have six 3x4 photo pockets. I used some of the sayings from the new release sets to add to my photos. On the Smirnof photo I stamped directly on the photo - it's 5 o'clock somewhere!
If you are a self-confessed planner nerd like me, I encourage you to look at your stamps in a new light and use them in your planners. For example: the swirls on either side of the words on the doilies is actually half a moustache from the Mister stamp set - true story!
To purchase Pink and Main stamps you can find them here .
DT Amanda
My creative planner this year is a Heidi Swapp Memory Planner which I use to document my everyday and special occasions. This is my spread for February so far:
I like adding lift ups too for more space for writing. For Valentines day I added a small accordion booklet to document my day with images and sayings from the new release stamp sets:
On the other page of the planner is a page of photo pockets. This month just happened to have six 3x4 photo pockets. I used some of the sayings from the new release sets to add to my photos. On the Smirnof photo I stamped directly on the photo - it's 5 o'clock somewhere!
If you are a self-confessed planner nerd like me, I encourage you to look at your stamps in a new light and use them in your planners. For example: the swirls on either side of the words on the doilies is actually half a moustache from the Mister stamp set - true story!
To purchase Pink and Main stamps you can find them here .
DT Amanda
Saturday, February 14, 2015
Pink & Main Fortune Cookies
You will be seeing quite a few creations using Pink & Main stamps for the next 6 months because I have been selected to be on the Pink & Main design team. Excited much? This is an exciting development for me and I am looking forward to making the most of this opportunity.
This is my first post on the Pink & Main design team. I am looking forward to working with the team and using the seriously cute stamp sets.
For my first post I decided to make fortune cookies which you could add little notes in for Valentines day or Chinese New Year (coming up this week). These little cookies are so quick to make and customizable for any theme you want. As you can see, I made a few with a couple of different themes.
Most of the cookies I decorated the front, one I left plain. You can also decorate the inside or just add a simple note. Here are close ups of the two I made with Chinese New Year in mind:
The red patterned paper is perfect for Chinese New Year and they also relate to the red envelopes that are given at that time of year.
Any patterned paper can be used and double sided paper gives the nicest result. However, you can also make you own patterned paper by stamping an image on plain paper as I did on the yellow cookie with the green shamrock. This way you can get more use out of your stamp sets.
The link to the Pink & Main blog post is here .
Here's a few more pictures that didn't make it to the blog post:
This one I made with Valentines in mind and made it a bit smaller. Wouldn't it be sweet to add a choc kiss in the back?
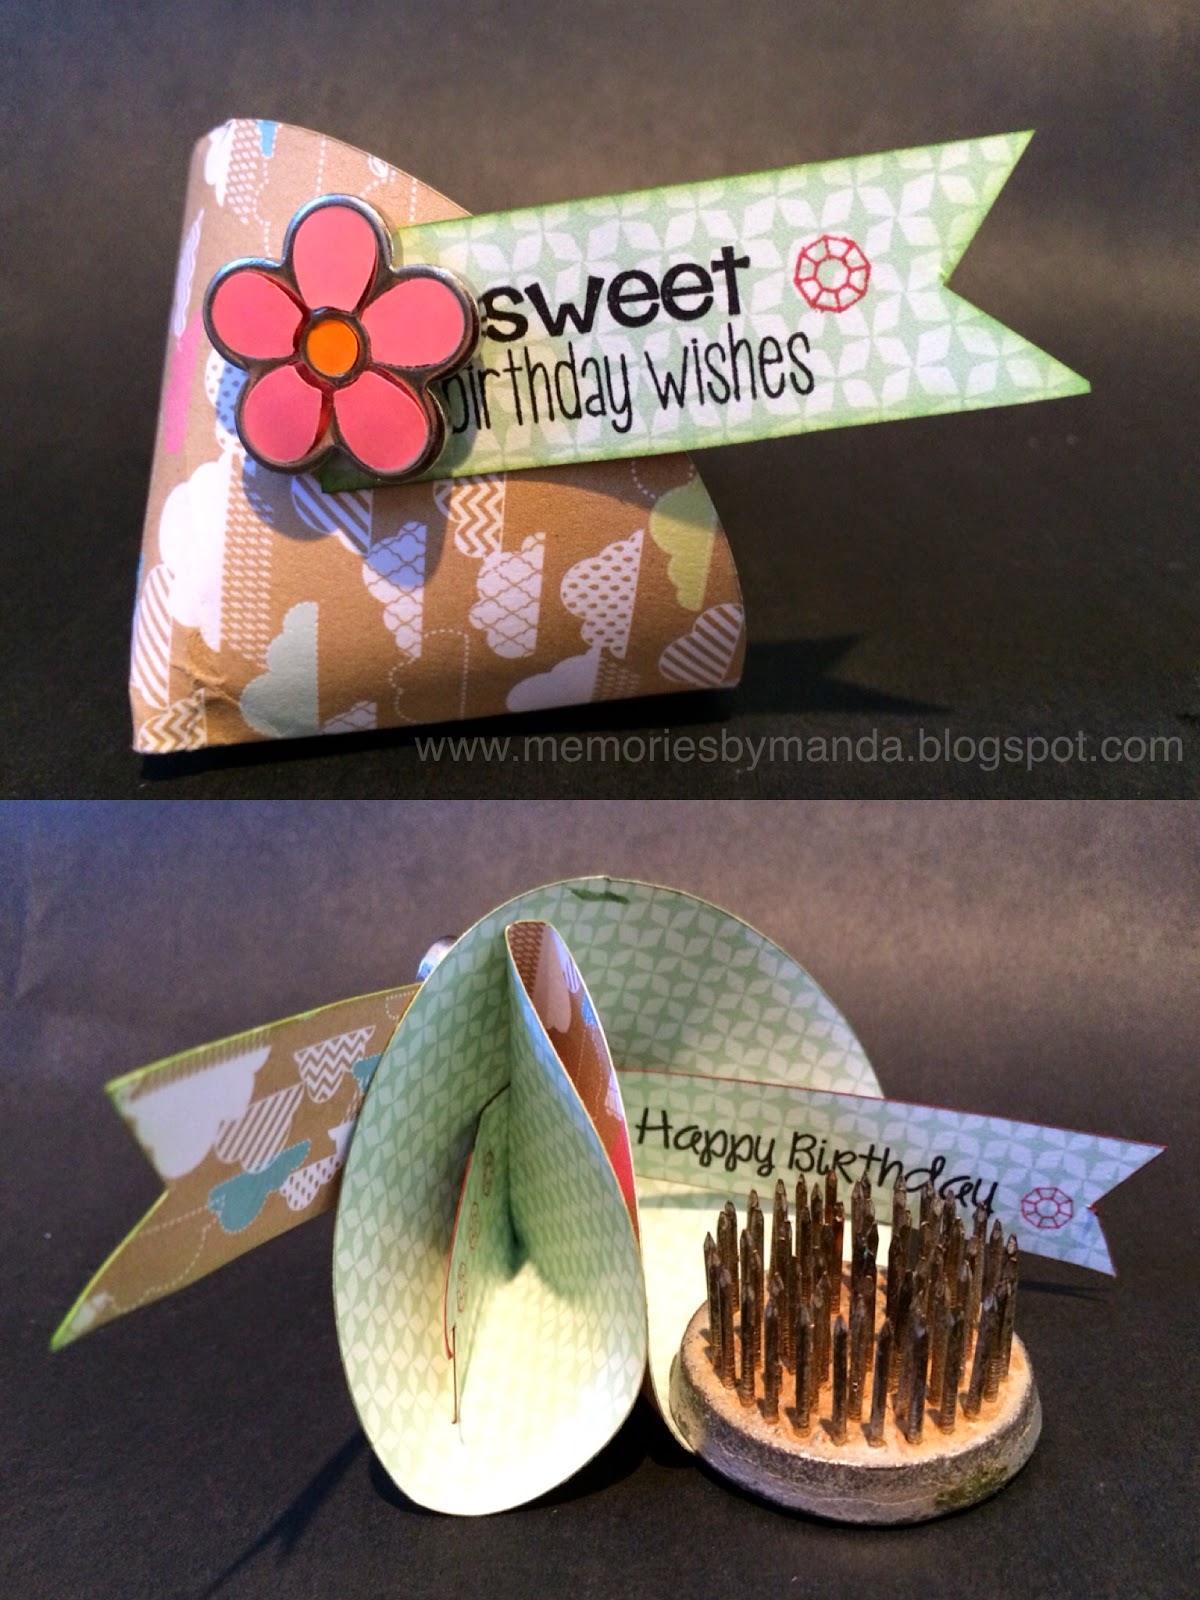
The next one I made with birthdays in mind. These would be a great alternative to birthday cards. FYI don't add a heavy embellishment like the flower to the side of these cuties - they will fall over!
Lastly a fortune cookie for a friend or family member. I stamped the paper with shamrocks to make the perfect themed patterned paper. I thought these would be great for St Patrick's day coming in March. FYI adding the heavy embellishment to the centre is a much better idea.
If you Google fortune cookies you will find a lot of instructions and you will notice that mine are slightly different. I wanted an opening in the back to add a message, decoration or chocolate.
You can glue them together with glue dots or hot glue. My glue dots didn't hold them so it was the glue gun for me. Guess how many fingers I 'burned' putting these babies together.
You can buy Pink and Main stamps here .
Materials:
Pink and Main stamps: Pandamonium,You Rocket, Soda Pop, Lucky Friend, Party Princess.
Papers & Cardstock: Bazill Basics, Stampin' Up!, Kaisercraft, Echo Park, Grant Archival
Ink: Ranger, Stampin' Up!, Tim Holtz
This is my first post on the Pink & Main design team. I am looking forward to working with the team and using the seriously cute stamp sets.
For my first post I decided to make fortune cookies which you could add little notes in for Valentines day or Chinese New Year (coming up this week). These little cookies are so quick to make and customizable for any theme you want. As you can see, I made a few with a couple of different themes.
Most of the cookies I decorated the front, one I left plain. You can also decorate the inside or just add a simple note. Here are close ups of the two I made with Chinese New Year in mind:
The red patterned paper is perfect for Chinese New Year and they also relate to the red envelopes that are given at that time of year.
Any patterned paper can be used and double sided paper gives the nicest result. However, you can also make you own patterned paper by stamping an image on plain paper as I did on the yellow cookie with the green shamrock. This way you can get more use out of your stamp sets.
The link to the Pink & Main blog post is here .
Here's a few more pictures that didn't make it to the blog post:
This one I made with Valentines in mind and made it a bit smaller. Wouldn't it be sweet to add a choc kiss in the back?
The next one I made with birthdays in mind. These would be a great alternative to birthday cards. FYI don't add a heavy embellishment like the flower to the side of these cuties - they will fall over!
Lastly a fortune cookie for a friend or family member. I stamped the paper with shamrocks to make the perfect themed patterned paper. I thought these would be great for St Patrick's day coming in March. FYI adding the heavy embellishment to the centre is a much better idea.
If you Google fortune cookies you will find a lot of instructions and you will notice that mine are slightly different. I wanted an opening in the back to add a message, decoration or chocolate.
You can glue them together with glue dots or hot glue. My glue dots didn't hold them so it was the glue gun for me. Guess how many fingers I 'burned' putting these babies together.
You can buy Pink and Main stamps here .
Materials:
Pink and Main stamps: Pandamonium,You Rocket, Soda Pop, Lucky Friend, Party Princess.
Papers & Cardstock: Bazill Basics, Stampin' Up!, Kaisercraft, Echo Park, Grant Archival
Ink: Ranger, Stampin' Up!, Tim Holtz
Subscribe to:
Posts (Atom)