Tuesday, December 13, 2011

What's On My Desk?

What's on my desk right now? A lot! I'm working on a little something for my niece which has turned into a little something multi-layered and time consuming. The first photo (below) is what the album started out as - $1 target mini album. It is no longer pink and I've had to make spacers for all the items I needed/wanted to add to the album. Still not finished which is why there is literally so much on my desk right now. I keep losing things and wasting time looking for things that I know are under the mass (not a typo) somewhere. You know you have to tidy up or reduce your stash when you can't find things. I 'lost' a new porcelain sanding foam within days of placing it on my desk. I can't find either my half-full large bottle of Kraftex or my glue gun. Neither live on my desk or in my creative space but I still can't find them. I ended up having to open a new, large bottle of Kraftex and buy a new [mini] glue gun. It's getting too expensive to be overwhelmed with mess (which is why I only replaced the glue gun with a mini version for $8). I think I may have lent them out and they never made it home again along with my chiffon ribbon spool that went missing over a year ago. Note to Self: maybe a New Years resolution should be start making notes/lists of items I lend out. I don't do New Years Resolutions, but if I did, I think that is a good one to start.
Lots of Blog-hopping going on at the moment - lots of competitions and inspiration on offer. O and I've recently discovered Pinterest! What an amazing, wonderful, distracting site! As well as the constant distractions there is the little issue of getting 4 weeks of work done in 3 with the Christmas break rushing it's way towards us. Plus: it's the Silly Season! So, there's a lot of celebrating going on. Not just Christmas celebrations happening around here either: I've had four birthdays to celebrate in the past three weeks (not all mine!). On top of all that, there has been some visiting friends from away, a wee bit of socialising, and maybe, not that I am confessing to anything here, a little, coughalotcough, of online shopping. O yeah, I am also contemplating submitting for a design team again - sucker for punishment? (That would require finding some time to actually create some submissions though). Phew! That's a lot going on which is why I hope you will forgive me for not updating or inspiring you.
The above picture is something I whipped up for a birthday - there seems to have been a real run on 40ths this year! I have Pinterest to thank for the idea - thank goodness the recipient had a sense of humour too! I think that this idea might be one I pull out again in the future (if the run on 40ths hasn't stopped).
Now, if you were reading closely you would've seen me mention blog-hopping and competitions. Well, I found out I received a prize from one of the blog comments I left! I was so stunned and blown away to receive the prize from Jennifer McGuire's blog. The prize was a Gift Certificate from Simon Says Stamp! I'm sure I will have no problem spending the voucher (and then some).
As a small way of showing my appreciation for their generosity I thought I would add links here for both of their sites:

Monday, November 14, 2011

I'm in Love...

I'm in love with Tim Holtz Tissue Tape - sigh! There may be an order of more than one wending its way to me as we speak (I neither confirm nor deny that statement).
When I was at one of those $2 shop style paces I came across some Kraft Paper Tape (just under 2" wide). As soon as I saw it, the wheels in my head started turning...imagine what I could do with that! Unfortunately, when I opened the packet (of course it came home with me!) the Kraft 'Paper' had a glossy finish which shut down many of the ideas churning around in my head. I thought it was plain paper topped and could be stamped and embossed. I did try embossing it but it was a disaster! Hmmm, I could try dry embossing it I guess but I might as well use Kraft cardstock for that. I did experiment with a grid stamp and stazon and that worked fine (spritzing it with Glimmer Mist did not work FYI!).
The strip on the left is a Tim Holtz Tissue Tape, did I mention I love Tim Holtz and his product? The middle strip is the kraft paper tape and the one on the right is the kraft paper tape I stamped on. It wasn't as versatile as I originally thought but I'm sure I will pull it out for the odd project here and there (not acid free though).
Just as well I have a few original Tim Holtz Tissue Tapes on their way :)

Monday, October 17, 2011

Sometimes You Have To Do What You Have To Do


You remember I said I didn't like to make cards right? Well, sometimes you have to do what you have to do.
Here's two cards I made with the stash from Create Auckland. They are 6x6" (new size for me) and I used a piece of Bo Bunny paper that already had fancy 6x6 designs on them. All I had to do was decide which ones took my fancy, throw on some Bo Bunny bling and brackets, a little stamping/embossing, some edge inking (Of course) and they were done. Not sure where I would find envelopes for them! The colours of the ETC range are great for masculine cards but I'm sure a female friend will be equally as please to receive one of them (once they are returned to me from Create of course).
Disclaimer: I need to add that, if you intend to make both the layout and the cards on this blog from the same stash of papers (as I'm sure someone is really going to bother to do!), you will need two pieces of the Bo Bunny paper. To make the cards I used the reverse side and used the 6x6 that had the tag on it I used in the layout. This can easily be avoided by not using the upper right 6x6 square (but I really liked it)!

Monday, September 26, 2011

Sick of the Blue Background?


Sick of the blue background? Me too! So, for the picture of my latest creation I changed the photo shoot location. I created this layout based around the die-cut Bo Bunny paper and a swirl from Bo Bunny in my kit from Fiona. The swirl direction didn't suit the layout design so I flipped it over and spritzed it with Smooch. Again it is a very different style for me but I totally love it! I may have given myself RSI spritzing all the doilies and used up all of my favourite Smooch colour (the brown) but I think it was worth it.
Two tips I learned in the creative process:
The dark rectangle shape under the swirl is actually one of those [really old] metal word plaques - I just coloured it with Stazon ink to match my layout
I wanted to emboss the pre-printed ring on the die-cut paper but my embossing pens always run dry before I even have a chance to use them. I used a refill bottle of Versa Mark ink to dab ink around the circle and then smeared it carefully with a paint brush (I'm not sure the colour it came with matched but it was too late to turn back once it was done!).
My Mum got given a present in the presentation box and passed it on to me - score! I glued mini pegs inside it with glass glaze so I can display my latest creations in it.

Friday, September 16, 2011

The Next Installment for Create Auckland


The latest parcel has arrived from Fiona @ Create Auckland. I have already started mapping out my project[s]. It's arrival meant I had to clean off my scrap table from the last project I worked on! Clean slate and ready to go.
On a side note: I am booked in for a class Wednesday night at a local scrapbook shop. I am looking forward to attending and having the project already designed for me. It is a mini book by Kathy Kirsten and I will load a picture when it is done.

Monday, September 12, 2011

Here's a Couple I Prepared Earlier


These photos were taken while the kids were playing on my ipod - they did oblige me with a lovely shot with all eyes on the camera. I started out with a layout idea I wanted to scraplift from a recent CK mag but none of my mini pics were of the right orientation to work with the sketch. So I decided to work with what I had. The paper is so glittery and gorgeous that I didn't want to over embellish it too much. I used a piece of HOTP embossible paper inked with several inks to get the right shade/look for the background paper. It actually took me ages to get everything just right so it looked simple and thrown together! Makes it an easy one to recreate which is what I did below:


The main diecut background paper came home with me from the US of A and, again, didn't need a lot of other layers added to it. I pulled out my shoe box of black and white embellishments and played around until I was happy. I got to use some items I had stored away for a 'special' layout (including the paper). Moral of the story: don't wait for a photo/event/layout to be special enough to use stuff. The epoxy stickers on the edge of the photo block look like part of the layout design but they are also tags with additional photos and stories (as shown below the layout). I used up some of the leftover strips of the embossible paper on this layout too (inked with black ink).

Saturday, September 3, 2011

I Broke the Rules (again)


It is not unexpected that I have broken the rules (again) as I've never been good with them but this time I broke one of my own rules! The rule I broke was this one: if I made the present, you don't get a handmade card. I figure if I went to all the effort of making you a gift then I can be excused from making a card. Don't you remember me confessing that I hate making cards? Well, I made my mother a birthday gift and I made her a card as well. Even though I still do detest making cards I really like how this turned out. I finally got to use the MS Buttefly punch I purchased a while back - see, I knew it would come in handy, that's why I had to buy it :)

My Mum has the same recipe book I remember from my childhood as well as a newer exercise book she adds new recipes to and several old, battered, long out of print recipe books. There are pages falling out of all the books (looseleaf A4 photocopies, handwritten recipes, and pages ripped from magazines) and the ones that are still in the books are barely hanging in there by yellowing sellotape. Some still have their own covers but most don't. I decided to make her a recipe book using a ringbinder folder where she could store copies of all her tried-and-true recipes in an organised way as well as plenty of space for new recipes. My Mum is not an overly Fru-fru kind of lady so I kept the design very simple and matched it to her current kitchen colours.

I copied some of her most used recipes - ok, I admit it, the ones I like the most - and have placed them in the folder. I have created some labels and dividers for her and have included extras for her to use to her preferences (with adhesive already attached). I wouldn't mind one of these babies for myself now.


Thursday, August 18, 2011

I have an excuse


The blog isn't being updated because I am creating. Because the item I am creating is for a gift, I can't share it on here yet - besides it's not finished yet. I'll update you when it's done and dusted, after it has been given to the recipient of course!

Monday, July 25, 2011

What to do on a Cold Winter's Day?


Create, of course! This mini album was made from one sheet of 12x12" paper (except that I found out after I assembled it that the paper was a little shy of 12" - it still worked out and I'm not going to tell you where it went wrong and how I covered it). Here's the link to the site where I got pictures and instructions from: http://papervinenz.blogspot.com/2011/01/baby-mini-album-plus-tutorial-day-3.html
Scotties crafts is having a challenge where the theme is: use paper from your stash that is at least a year old - I've got plenty of that! I used a piece of paper from K&Co which is definitely more than a year old (but still good). I also used some K&Co tags and rub-ons, My Minds Eye papers and [old] expoxy stickers for the inside pages. My trusty photo corner punch got a workout as well - have you noticed how often I use it on my layouts? I decided to use the mini album I made and use pictures from our day at San Diego Zoo. I'm a fan of mini photos so off I trotted to Harvey Normans to save money on photo developing only to walk out with an external hardrive as well - hmmmm, how did that happen?
Here's the link to the Scotties challenge page: http://scottiecraftsnz.blogspot.com/2011/07/july-challenge-finally.html

Monday, July 18, 2011

A Card and A Freebie


Let's hope the recipient of this card isn't blog hopping, but then again, she is turning two so I think it's safe to share. My original idea was simply an excuse to use the [new-to-my-stash] mini rosette die from Tim Holtz with a large #2 in the middle. I remembered that the recipient is mad on ducks at the moment and is having a duck theme birthday - boy, I really hope she isn't reading this! I looked at all my punches and discovered that, although I have many of them, not one of them was a ducky. I knew none of my cricut cartridges had a duck on it because the Mum had already asked me (for the invites I think). I was pretty sure that amongst my entire stash I would find at least one thing ducky - and I did (while searching in my Girl/Boy/Childhood box for the base patterned paper - I knew I had that!). Unfortunately ducky was too big for the mini rosette so it had to be hand cut down to size (too thick for EK Success scallop circle punch it turns out!). I guess that means I have to buy the standard rosette size die now, right? Ducky also had the word "baby" on it which I didn't think Miss Two would like but luckily I could stick with my original intention of putting #2 on it strategically placed to cover most of the offending word.


Now, for the freebie. While I was blog hopping yesterday I came across a link for a scrapbook and card magazine website. The magazine is published for the Canadian and US market but international viewers can download the magazine in its entirety for free!
Enjoy!

Wednesday, July 6, 2011

New Sites Added

It seems that I check my favourite sites on my lunch break through my blog. I have now added more sites to the right simply to make it easier for me to indulge my addiction without having to sign in to my blog (and therefore avoiding feeling guilty for not posting). I did see a great mini album idea on the Artfull Crafts site which I menat to have a go at last night but I got distracted by 'researching' on Joann.com ;)

Saturday, June 18, 2011

Final SENZ Layout


Remember that box of goodies I showed you last month? Well, here's another layout that I whipped up with the contents. It sat on my desk for weeks and I couldn't seem to get it right but now it's done, I am more happy with it than I expected. The photo doesn't do it justice but it has a real deep richness to it and when the light hits all the bronzed and glittered bits, it glows. The photo corners and the flower got a dose of Zing Glitter Embossing powder to match the bronze trim from the box (German Scraps?). The Journal Spot (place for my own photo when I eventually get to Italy myself) and some of the cut-out embellishments were all popped up with foam dots. I got to play with the Tim Holtz resist kraft paper and spray inks. I even got to use some new Spellbinders dies to cut the trim (not that I am admitting to having bought more stuff ;) Keep an eye out for it at Fiona's stand at SENZ next weekend: Create.
PS the photos of Italy came from a free photo website: www.freefoto.com
That's the legal bits out of the way then!

Wednesday, June 15, 2011

Im Bored So You Get A Blog Post Today


It's really boring being home sick so I am filling in my time by blogging and catching up on my own blog-hopping. Lots of ideas make me want to scrap but not feeling up to it. I have had a layout sitting on my desk for weeks (no exaggeration). I just can't seem to get it 'just right'. Seems I have forgotten my 'just glue it down' philosophy but it is a design for someone else which will be on show at SENZ. Only one week to go till SENZ (I better be better by then!). Sadly I missed out on booking into the class I wanted to do but I will just have to console myself with shopping instead.
It was my Dad's birthday this month so here's the card he got. I meant to photograph the inside before I wrote the sentiment but I forgot. I am really happy with this card. I added clear OHT to the bottom of the trimmed card front so that it could still stand up on its own. The blue felt trim was a last minute addition and I was worried that it wouldn't work with the green but I think it turned out great! He liked it and that's the main thing.
I am submitting this card and post to the latest challenge at Southern Girls Challenge site:
The challenge was: anything goes! (Lucky for me, eh ;)

Saturday, May 14, 2011

Ta Da!


Still having trouble with blogger but I managed to get one blog post posted - let's try for another.
Here's the layout I created from the goodies from Create for Create. As usual things didn't go smoothly. The ink on the word memories matched the burgundy trim perfectly, that is, until I added Glass Finish to it! The beautiful, matching burgundy faded to a paler shade of red. Then, my favourite glue (Pritt Power Gel) ran out right when I needed to glue the plastic/chipboard bits down {while nearing a personal deadline too}. I had to use the same glass finish to attach the chipboard and the buttons. This is a great tip/glue for using on buttons/plastic but not so good on my Glass Finish Chipboard word - the ink ran, again, and became more orange then red. O well , still looks good and I am happy with the overall layout - it could work with any two landscape 4x6 photos.
The torn out strips are backed with printed tissue tape. To strengthen the torn out sections of the page while still retaining the opacity of the tissue paper I backed the torn bit with heavy acetate.
I had a lot of fun distressing everything - a new technique for me. It did feel a little unnerving using the Heidi Swapp Distresser, inking everything heavily and tearing! It was more nerve-racking because I was creating it for someone and it was going on display. At least, whenever I felt I had overdone it I could shrug it off and call it distressed!

Look What Arrived....


This little package from Fiona @ Create arrived a week ago but this is the first time I have been able to blog and load a picture of the goodies - thanks Blogger Update! I have been having difficulties publishing posts from the laptop since I upgraded Outlook and have to publish them from work. Let's hope this works today or you will have to wait, again, until Monday.
I have already completed a layout from the pack using some pics from my trip to Ireland in 2009. I took a picture of it today to load to the blog but, go figure, my watermarking software had a hissy fit and froze! Grrrr, times like these I really dislike not being tech savvy!!!
Fingers crossed.....

Tuesday, May 3, 2011

I Couldn't Resist


I couldn't resist having a play with some of my new stuff. I grabbed a piece of scrap cardstock and cut out the new Ticket die. Then I had to stamp it up with the matching Tim Holtz stamps and distress inks. I love how they all work together. Not one to waste paper, I then played with the negative of the ticket die. Unfortunately I grabbed a glossy piece of paper to play with and the new ink didn't like it. The ink wasn't drying (smudged a bit) so I covered it with clear embossing ink and heat embossed it. What I didn't know was that this made the ink fade by at least two shades!
Things I learnt today:
I need lessons on my Fiskars Stamp Press
Glossy paper needs more skills than I have at this stage
Clear embossing powder causes distress inks to fade
Don't start playing on your day off before you do the jobs you need to do (I knew that already but I chose to ignore it!)

Saturday, April 30, 2011

I May Have Gone Shopping


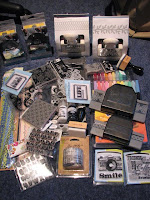
While I was away I managed to sneak in a visit to Michaels & Joanns - thank you Joanns for your fabulous sales plus discount coupons (40% and 50% off an item - yes, please!). How naive was I? I thought my newly acquired goodies would fit in one photo! After I took the photos I realised I missed a couple of items - stamp press mini & original, sizzix ticket die and a stamp set.


I thought I would share it with you all. When the BFF saw my collection she pronounced that I had a problem. However, her exclamation was soon followed by lots of oohing and aahing. I think I am not alone in my addiction. I'm sure she won't mind if they come over for a play date some time soon.


I was stoked to see Joanns supply of unmounted, self-cling, rubber stamps. I love acrylic stamps for their price and ease of storage but there's no doubt in my mind that rubber stamps provide much better stamped images. Needless to say, a few sets came home with me that day (30% off - yes, please!). I can't wait to play with them and the punches. There's also a piece of green paper that is printed to look like crocodile skin and feels like suede - unfortunately there was only one sheet in the particular green I liked.

Why am I blogging when there are new toys to play with.......?

Friday, April 1, 2011

A Hiatus of Sorts

Instead of simply not updating my blog for a while I will just put it out there that I will be on a crafting hiatus for a few weeks (6-7 weeks - that sounds a long time when I actually write it down). However will you survive I hear you exclaim - don't worry, I will be back (with or without Arnie impersonation - your choice!). Because of time and supply constraints I wasn't able to do my first project for Create for Create in March as planned. But I am scheduled to create a project for Create for Create when the hiatus is over - not before mid-May. I'm looking forward to it as it is weird walking past my creative space and seeing it cleared (I mean, you can actually see some of the table top and the other half has been folded down, most of the floor is visible too!). Must rectify that as soon as possible. See you in May!

Thursday, March 10, 2011

Embrace Imperfection - The Mini Book


The Embrace Imperfection online class I was taking included homework. I haven't done homework since leaving school and Uni and even then I'm not sure I was good at actually doing it. The homework was optional, we were given a PDF of several quotes about perfection/imperfection. At first I thought: "I am not wasting my precious crafting time/energy on creating something because I am supposed to. And do I really need a mini book to remind me to let go of perfection?". But, the idea grew on me. Some of the ladies on the online chat encouraged me to scrap book in 10mins sessions so I decided to give it a go. I made the book slowly over the last two weeks - 10 mins here, half an hour there.

The mini book started out life as a child's story book that I bought from an op shop for 20cents. It is only about 3" and had 10 pages so that reduced my workload. I had a theme of yellow and grey and stamped journal ling spots on blue cardstock. I didn't really have a theme after that and ended up not liking the grey ink either. I basically took each double page as a layout and they match but the pages themselves don't necessarily match each other. Can you guess which page I really don't like?


The front cover is much more my style and I really like it. I chose a random piece of patterned paper near my desk and used that on each page. I cut one for each page, inked it and glued it down (the glue stick I used didn't really work but I decided not to worry about that - it's not like my ancestors are going to be terribly interested in this wee creation!). I decided to leave the front page blank, thank goodness as now that it is done I wished I'd used the crumbled yellow paper I used on the spine for the back page too - never mind, too late now.

Every time I made a 'mistake' I laughed at myself and had to let it be - the book title is "Embrace Imperfection" after all.

Thursday, March 3, 2011

One Little Word for 2011: Hush


Here's a double sided layout that I mentioned earlier. It took me awhile but I really like it. It is based on a concept by Allie Edwards (love her stuff) which is having a word for the year. Previously, I will confess, that I thought the whole idea ludicrous. Who needs a word for a year and who needs to create a layout or piece of art as a reminder of the word? Turns out - I do and I did! I don't know how it happened but somehow I ended up wondering what my word would be and the word Hush popped in to my head. It really fitted with some personal things that I wanted to focus on and improve both for myself and for the people I love.


A word of warning here: the word Hush is not for people to use on me - that would illicit such a rapid and ferocious response from me that it would totally negate the Hush concept for me! It's just a visual cue to me for me to process. I added my journaling (what the whole thing means) behind the coloured photo on the cream/teal side and the tab keeps it closed (for my own personal perusal). The photo is of a painting I have hanging in my creative space. I absolutely love this painting/print and it fills me with such a sense of Hush (like you feel at a gallery amongst some masterpieces) so it was the perfect photo to use.

Thursday, February 10, 2011

Embrace Imperfections

At last, I've found a teacher who tells me to "Embrace Imperfection". I am doing a *FREE* class at Big Picture Scrapbooking called "Embrace Imperfection" by Karen Grunberg - a lady after my own heart. I highly recommend it to any one who, like me, can't glue things down straight, occasionally end up with ink/pen marks where there shouldn't be any or spends hours 'flaffing' with the smallest details of a layout (I need the right embellishment of the right colour and the right placement of said embellishment). You've heard me say it before and I'll say it again - glue it down and call it 'done', then move on to the next project.

Monday, February 7, 2011

Better Photo


I managed to take a better photo of the close-up of the faux crackle on the layout for the Aussie Scrap Source competition in November - remember the one you all voted for :)

5-6 layers of Clear embossing powder ( I don't have UTEE but it would've made the process faster) then pop it in the freezer for 10-15 mins then bend it to crack it. Not my own technique - I saw it on a Stampin' Up! demonstrator's blog who got it from Split Coast Stampers. Tried it out straight away and love it. I think it will be popping up again in future layouts.

Thursday, February 3, 2011

Less Talk, More Scrapping


Someone recently told me that I talk - a lot. (It's true) . Then I noticed that my blog is very wordy so here's going against convention and a short post. This layout is about one of my BFF's daughters and links to a much earlier post with the story of "U my fren ay? It is a very different style for me but I like the result. I wanted the photo, title and story (written around the edge) to be the focus (The blocks of orange cardstock just cover up personal details - not actually part of the design).

Just finished a double-sided layout with an acetate/OHT panel (hence the need to be double-sided). I love it but I'm not quite ready to show it to you yet.

Wednesday, January 5, 2011

It's the new year already?


Where did 2010 go? Considering it's been two months since the last blog post I probably should make 'blogging more regularly' a new year's resolution. Lots has been happening since the last post including a week enjoying the sun in Oz. It was unusual for me to go on a holiday overseas where I wasn't doing any sight seeing or visiting. All I did was relax and maybe a little shopping; it was just perfect. I've also just got back from New Years at the beach which was another nice break from the everyday (and work).


I finally got my layout back that was published in Up2Scrap and I can share it with you here. I saw the issue in the supermarket and opened it to have a look at my layout. i got a bit of a shock to see it was used for the opening page of that section. It was a half page photo which gave me a bit of a shock! I was disappointed to note that they had put the hanging medallion up in their picture. I guess they did that to make it easier for people to read the journalling. but to me it just left a gapping [but delicately shaded] hole in the layout. I was hoping to get some creating done over the Christmas break but it has been too hot. Besides, after the month I had in December I was hanging out for some time off to just relax! I will also load a picture of the acrylic layouts I did at SENZ in July (and finished much later). I've also loaded a close up of the dog's layout so you can see just how gorgeous my wee man is - and the embellishments that hang of the edge too :)

Back to relaxing for me and maybe I'll start on all the projects and ideas that are piling up in my head and on my workdesk.